
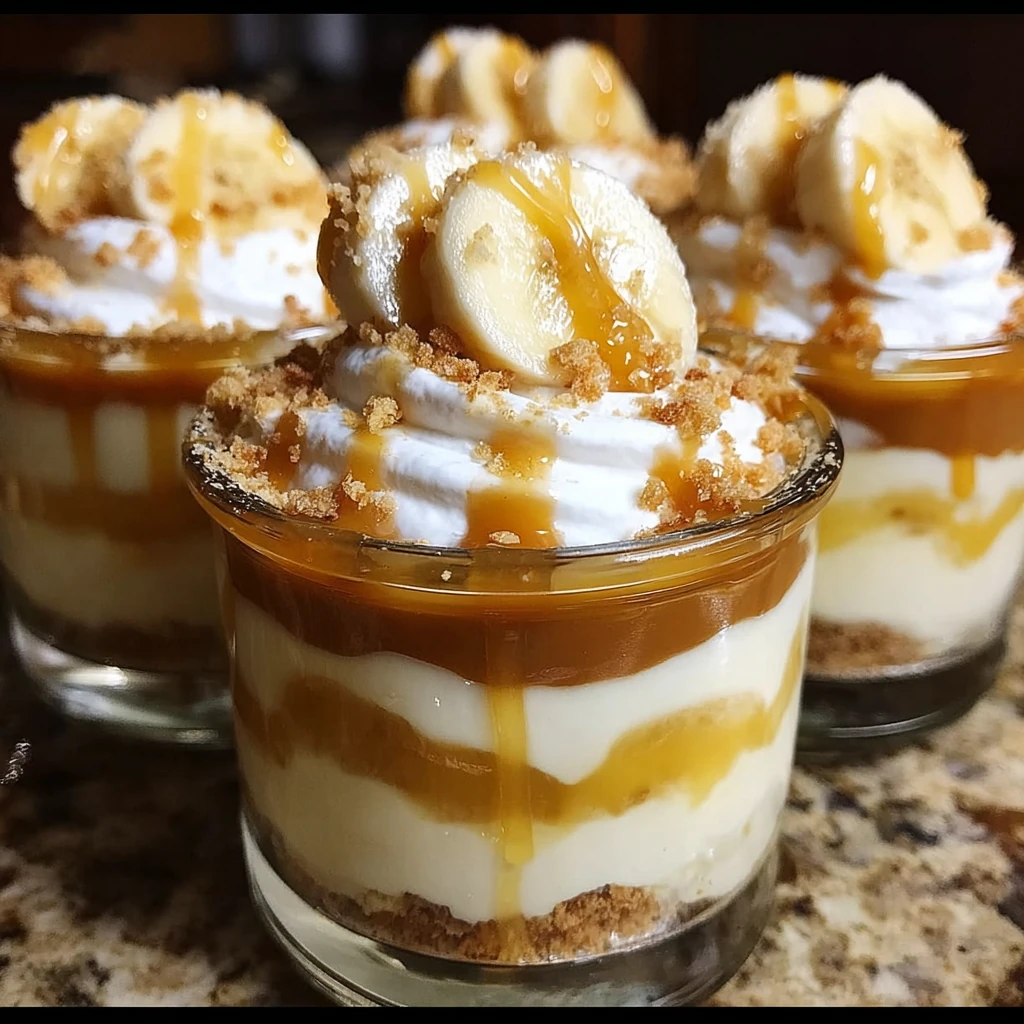
If there were an official dessert of pure delight, Caramel Banana Pudding Cups would absolutely take the crown. Imagine sinking your spoon into layers of silky vanilla pudding, ribbons of golden caramel, ripe bananas, fluffy whipped cream, and buttery vanilla wafer crumbs—each mouthful is a mini celebration. These individual pudding cups aren’t just a treat; they’re the sweet finale your next gathering—or quiet evening at home—craves. Whether you’re a seasoned home baker or a kitchen novice looking for impressive but fuss-free desserts, this Caramel Banana Pudding Cups recipe is your ticket to instant dessert stardom. Not only are they visually stunning (as you can see above), but the endless texture and flavor contrasts make them downright unforgettable.
This blog post will guide you through every step, ingredient, and technique needed to create these luscious Caramel Banana Pudding Cups. You’ll pick up essential tips, clever substitutions, presentation inspiration, storage know-how, and plenty of pro tricks along the way. So grab a mixing bowl and your ripest bananas—the best Caramel Banana Pudding Cups of your life are just a few easy steps away!
Table of Contents
Why You’ll Love Caramel Banana Pudding Cups
- Produce delicious, crowd-pleasing desserts in under 30 minutes.
- No-bake recipe that’s perfect for parties, potlucks, or snacking.
- Gorgeous presentation—layers of creamy pudding, caramel, bananas, and wafers in every bite.
- Wonderfully customizable with basic pantry ingredients and your favorite flavors.
- Kid-friendly and adult-approved—a true classic with a luscious twist!
- Make-ahead convenience for stress-free entertaining.
Ingredients for Caramel Banana Pudding Cups
Each component in these Caramel Banana Pudding Cups contributes to a symphony of flavors and textures. Here’s everything you need to assemble this show-stopping treat:
- 2 cups cold milk – For dissolving and whipping up the pudding mix. Whole milk gives extra richness, but 2% can work in a pinch.
- 1 box (3.4 oz) vanilla instant pudding mix – The foundation for your pudding layer. Instant pudding ensures quick and reliable setting.
- 1 cup heavy whipping cream – Adds a homemade, fluffy texture to the pudding and forms the whipped topping.
- 2 tbsp powdered sugar – Sweetens and stabilizes the whipped cream, keeping it light and cloud-like.
- ½ tsp vanilla extract – Enhances the flavor of the pudding and whipped cream alike.
- 2-3 ripe bananas, sliced – Choose bananas with some brown speckles for best natural sweetness and creamy consistency.
- 1 package of vanilla wafers – The classic vanilla wafer works as the crunchy, buttery base and layers throughout.
- ½ cup caramel sauce (store-bought or homemade) – Provides rich, golden sweetness and ties every element together.
- Crushed vanilla wafers for topping – For a beautiful, crunchy finish and extra visual appeal.
These simple ingredients transform into a dessert sensation that’s as elegant as it is effortless. When selecting your ingredients, opt for high-quality pudding mix, real vanilla extract, and bananas at peak ripeness for the finest Caramel Banana Pudding Cups.
Necessary Tools
Having the right kitchen tools takes this Caramel Banana Pudding Cups recipe from easy to completely foolproof. Here’s what you’ll need before you begin layering:
- Large mixing bowl – For preparing the instant pudding base and blending whipped cream.
- Electric hand mixer or stand mixer – Ensures whipped cream is airy, smooth, and stable.
- Medium mixing bowl – Handy for combining smaller amounts or whipping cream separately.
- Mixing spoon or spatula – For gently folding ingredients together without deflating the whipped cream.
- Whisk – Helps dissolve the pudding mix quickly and smoothly.
- Paring knife – To neatly slice the bananas just before layering to avoid browning.
- Small glasses, dessert cups, or mason jars – Show off the beautiful, layered effect. Clear glass cups or jars are ideal.
- Piping bag (optional) – For creating picture-perfect swirls of whipped cream topping.
- Measuring cups and spoons – Ensures accurate quantities for pudding, cream, and caramel.
- Food processor or rolling pin – To crush vanilla wafers for base and topping crumbs.
- Rubber spatula – Helps you scrape every last bit of pudding and whipped cream from the bowl.
With these tools, you’ll be layering and serving up stunning Caramel Banana Pudding Cups with total confidence.
Ingredient Additions & Substitutions
One of the many joys of Caramel Banana Pudding Cups is their incredible adaptability—there’s room to riff and play with flavors without ever compromising the magic. Here are some creative ingredient additions and smart substitutions to inspire your next batch:
Creative Additions:
- Salted caramel sauce: Swap classic caramel for a salted caramel to add sophisticated depth—a pinch of sea salt balances the sweetness beautifully.
- Chocolate chips or shavings: Add mini chocolate chips or chocolate shavings between the layers for a banana-chocolate-caramel dream.
- Peanut butter drizzle: Pair a swirl of creamy or crunchy peanut butter with caramel for a nutty, irresistible layer.
- Toasted coconut: Sprinkle sweetened toasted coconut for extra crunch and a tropical flair.
- Fresh berries: Add fresh strawberries, raspberries, or blueberries for a tangy burst of flavor alongside the banana.
- Toffee bits: Sprinkle toffee bits between layers or on top as a final garnish for extra caramelized crunch.
Substitutions:
- Dairy-free alternatives: Substitute coconut cream or almond milk for the heavy cream and use a dairy-free pudding mix. Ensure caramel sauce is also vegan/dairy-free.
- Gluten-free vanilla wafers: Swap traditional vanilla wafers for certified gluten-free versions if needed.
- Banana substitutes: Try sliced strawberries, peaches, or even roasted pineapple if bananas aren’t your favorite.
- Homemade pudding: If you prefer skipping boxed mixes, homemade vanilla custard or pudding will beautifully elevate the recipe (just allow time for proper chilling).
- Cookie swap: Use graham crackers, Biscoff cookies, or ladyfingers in place of vanilla wafers for a unique twist.
- Lightened Up Version: For a lighter, less rich dessert, substitute half-and-half for heavy cream and/or use a sugar-free pudding or whipped topping.
Just remember, the key to delightful Caramel Banana Pudding Cups lies in keeping balanced flavors and maintaining that signature creamy-crunchy-soft layering. Feel free to personalize based on what’s in your pantry or what your guests love most!
How to Make Caramel Banana Pudding Cups
Creating Caramel Banana Pudding Cups is a fun, hands-on process that’s as enjoyable as eating the finished dessert. Here’s a step-by-step guide to crafting these stunning pudding cups, with expert pointers for perfectly defined, scrumptious layers every time.
Step 1: Prepare the Pudding Base
In a large mixing bowl, whisk together the cold milk and vanilla instant pudding mix. Blend for about 2 minutes, until the mixture thickens and becomes creamy. Set aside for 5 minutes to allow the pudding to set further, ensuring it’s thick enough to layer without running.
Step 2: Whip the Cream
Using a stand mixer or electric hand mixer, beat the heavy whipping cream, powdered sugar, and vanilla extract on medium-high speed until stiff peaks form. This process takes 3-4 minutes. Be sure to not over-whip, or the cream could turn grainy. Reserve half to fold into the pudding; the rest will be piped or spooned on top of the pudding cups.
Step 3: Combine Pudding and Whipped Cream
Gently fold half of the whipped cream into the set pudding using a spatula. This creates a light, mousse-like texture. Leave the remaining whipped cream in a separate bowl for topping later.
Step 4: Prep the Banana Slices and Wafers
Slice the bananas just before assembly to prevent browning. Use a food processor or a sealed plastic bag and rolling pin to crush a portion of the vanilla wafers for the base and for the garnish. Keep some whole wafers for a more defined crunch, if you like.
Step 5: Layer in the Dessert Cups
Begin with a spoonful of crushed vanilla wafers at the base of each cup. Add a layer of pudding-cream mixture, followed by a drizzle of caramel sauce. Place banana slices evenly on top. Repeat layers—a second scoop of wafers, pudding, more caramel, and banana slices—until you reach the top of the cup.
Step 6: Add Whipped Cream and Final Touches
Pipe or spoon the reserved whipped cream over the final banana layer. Drizzle with more caramel sauce and finish with a sprinkle of crushed vanilla wafers. Add extra banana slices or a caramel swirl for a decorative touch.
Step 7: Chill and Serve
Place the assembled Caramel Banana Pudding Cups in the refrigerator for at least 1 hour to let flavors meld and layers firm up. Serve chilled, straight from the fridge, for the ultimate creamy, cool dessert experience.
Serving Suggestions
The beauty of Caramel Banana Pudding Cups is their versatility—they’re as perfect for elegant dinners as they are for laid-back backyard BBQs. Present them in individual dessert glasses or mason jars to showcase those gorgeous layers. For casual gatherings, assemble them in stemless wine glasses for a touch of elegance that’s still approachable.
Elevate the presentation with:
- Edible gold leaf or gold sprinkles for a celebratory vibe
- A dusting of cocoa powder for contrast
- Fresh mint leaves for color and aroma
- Mini chocolate curls or caramel candies as eye-catching toppers
Pair these Caramel Banana Pudding Cups with rich coffee, hot chocolate, or a crisp glass of prosecco for a truly indulgent finish to your meal. Set them on a dessert bar alongside other favorites or wrap them with a ribbon as a takeaway gift for guests.
Pro Tips & Tricks
You don’t need professional pastry training to create show-stopping Caramel Banana Pudding Cups—just a few clever tricks will set your dessert above the rest:
- Keep bananas fresh: Toss banana slices with a few drops of lemon juice to slow browning while maintaining sweet flavor.
- Make ahead: Assemble cups up to 24 hours in advance and add the final whipped cream and toppings just before serving for best texture and appearance.
- Even layers: Use a piping bag or zip-top bag with the corner snipped to neatly distribute pudding and whipped cream for Instagram-worthy stripes.
- Extra crunch: Layer whole vanilla wafers in addition to crushed ones for contrasting textures.
- Custom caramel: Make homemade caramel sauce for deeper, richer flavor, but don’t hesitate to use high-quality store-bought for convenience.
- Garnish last: Hold off on adding delicate toppings (bananas, crushed wafers) until just before serving to maintain crunch and freshness.
- Room temperature pudding: Allow pudding mixture to sit out for a few minutes before layering, as colder mixtures can be harder to spread smoothly.
- Small batch option: Halve the ingredients for an intimate dessert night or double for a large crowd.
These simple pointers will guarantee flawless, crowd-pleasing Caramel Banana Pudding Cups every single time.
Storage Instructions
Caramel Banana Pudding Cups are the definition of make-ahead dessert convenience. For optimal taste and freshness, follow these simple storage guidelines:
- Refrigeration: Cover the assembled pudding cups with plastic wrap or tight-fitting lids and refrigerate for up to 2 days. This helps the flavors meld and keeps the layers intact.
- Avoid freezing: Freezing is not recommended, as pudding and bananas may become watery or mushy upon thawing, damaging the gorgeous layers.
- Fresh toppings: For the best results, add the final swirl of whipped cream, bananas, and wafer crumbs just before serving.
- Separate elements: If prepping ahead, you can make the pudding, whipped cream, and crush wafers a day in advance, storing each separately, then assemble just before guests arrive.
Stored and handled properly, these Caramel Banana Pudding Cups will remain fresh, beautiful, and absolutely crave-worthy.
General Information
Caramel Banana Pudding Cups combine classic Southern comfort with modern dessert trends—they celebrate familiar flavors while delivering a gourmet, Instagram-ready presentation. Each bite is a study in contrasts: creamy vanilla, sticky-sweet caramel, soft ripe banana, and toasty vanilla wafers.
This versatile dessert is a hit across all ages and occasions and is notably:
- No-bake, meaning you won’t overheat the kitchen.
- Ready in under 30 minutes with minimal active time.
- Perfectly portioned, making it easy for guests to enjoy (or for you to sneak seconds!).
- Naturally scalable; you can make a few cups or a whole party tray.
- Easy to personalize for holidays, birthdays, anniversaries, or just because.
No matter whether you’re new to pudding desserts or a lifelong fan, Caramel Banana Pudding Cups will win you over with their comfort, ease, and addictive caramelized flavor.
FAQs
Can I make Caramel Banana Pudding Cups ahead of time?
Absolutely! You can assemble the pudding cups (minus the final toppings) up to 24 hours in advance. For best texture and appearance, add whipped cream, wafer crumbs, and banana slices just before serving.
What kind of caramel sauce should I use?
Both store-bought and homemade caramel sauce work well for this recipe. Opt for a thick, pourable variety that drizzles easily but isn’t too runny. Salted caramel is a delicious twist if you want a more complex flavor.
How do I keep bananas from turning brown in the pudding?
Toss the banana slices in a small amount of lemon juice before layering. This helps prevent oxidation and keeps the bananas looking fresh and appetizing for longer.
Can I make this dessert gluten-free or dairy-free?
Yes! Use gluten-free vanilla wafers and certified gluten-free pudding mix for a gluten-free version. For dairy-free Caramel Banana Pudding Cups, substitute plant-based milk and non-dairy whipped topping. Ensure caramel sauce is also dairy-free.
Can I use homemade pudding instead of instant?
Definitely. A homemade vanilla pudding or custard elevates the flavor and texture, though you’ll need to allow more time for it to set and cool before assembling the cups.
What do I do if my pudding is too runny?
Let the pudding set for an additional 5-10 minutes in the fridge. If it’s still too thin, try adding a couple extra tablespoons of instant pudding mix and whisking it in, then chill again before using.
Is this recipe kid-friendly?
Absolutely! Kids love both assembling and eating these Caramel Banana Pudding Cups. They’re also wonderfully portioned for little hands.
Can I double or halve the recipe?
Yes—to serve a larger crowd, simply double all ingredients. For a small batch, halve the quantities accordingly. The layering process remains the same.
Conclusion
Caramel Banana Pudding Cups bring the perfect blend of nostalgic comfort and modern decadence to your dessert table. Whether you’re hosting a party or treating yourself, these no-bake, make-ahead treats never fail to impress. Every creamy, caramel-drizzled bite is guaranteed to delight guests of all ages—so why not make a batch today? Get ready to fall in love with your new favorite pudding recipe!
Nutritional Information
While exact values depend on serving size and brands used, each Caramel Banana Pudding Cup (assuming 8 servings) contains approximately:
- Calories: 310-360
- Total Fat: 16-20g (mainly from cream and caramel)
- Carbohydrates: 41-47g (including natural sugars from bananas, added sugars, and wafers)
- Protein: 4-6g
- Fiber: 1-2g
These pudding cups are undeniably a treat—so savor each decadent, layered bite. If you want to lighten up the recipe, substitute low-fat or non-dairy whipped topping, sugar-free pudding, and use less caramel. Regardless of adjustments, these Caramel Banana Pudding Cups serve all the comfort and sweetness guaranteed to bring smiles to any table.
Print
Caramel Banana Pudding Cups
- Total Time: 25 minutes plus 1 hour chilling
- Yield: 8 servings 1x
- Diet: Vegetarian
Description
Individual layered dessert cups featuring silky vanilla pudding, golden caramel sauce, ripe bananas, fluffy whipped cream, and buttery vanilla wafer crumbs. A no-bake treat that’s perfect for entertaining and ready in under 30 minutes.
Ingredients
- 2 cups cold milk
- 1 box (3.4 oz) vanilla instant pudding mix
- 1 cup heavy whipping cream
- 2 tbsp powdered sugar
- 1/2 tsp vanilla extract
- 2–3 ripe bananas, sliced
- 1 package vanilla wafers
- 1/2 cup caramel sauce (store-bought or homemade)
- Crushed vanilla wafers for topping
Instructions
- In a large mixing bowl, whisk together cold milk and vanilla instant pudding mix for 2 minutes until thick and creamy. Set aside for 5 minutes to set further.
- Using an electric mixer, beat heavy whipping cream, powdered sugar, and vanilla extract on medium-high speed for 3-4 minutes until stiff peaks form.
- Gently fold half of the whipped cream into the set pudding using a spatula. Reserve remaining whipped cream for topping.
- Slice bananas just before assembly. Crush portion of vanilla wafers using food processor or rolling pin.
- Layer in dessert cups: Start with crushed wafers at base, add pudding mixture, drizzle caramel sauce, place banana slices. Repeat layers until cups are full.
- Top with reserved whipped cream, drizzle with more caramel sauce, and finish with crushed vanilla wafers.
- Refrigerate for at least 1 hour before serving to let flavors meld and layers firm up.
Notes
- Toss banana slices with lemon juice to prevent browning
- Can be assembled up to 24 hours in advance – add final toppings just before serving
- Use piping bag for neat, even layers
- Allow pudding to reach room temperature before layering for smoother spreading
- Do not freeze as bananas and pudding may become watery
- Store covered in refrigerator for up to 2 days
- Prep Time: 25 minutes
- Cook Time: 0 minutes
- Category: Dessert
- Method: No-Bake
- Cuisine: American
Nutrition
- Serving Size: 1 cup
- Calories: 310-360
- Fat: 16-20g
- Carbohydrates: 41-47g
- Fiber: 1-2g
- Protein: 4-6g